You may see pictures all over the Web that move. Sometimes these are Flash movies and other times they are animated GIFs. If you right-click on a picture, click on Properties, and the file ends on .GIF then it is an animated picture. This kind of animated picture loads fast and it is something you can make yourself. If you right-click on a picture that moves and you get the Flash menu then you know it is a Flash movie.
You can easily create one to use as a moving graphic on your website or blog or even as an Avatar. You can create a moving advertisement by making an animated gif too.
You can create an animated GIF using PhotoShop, Adobe Photo Elements or other software but you can also create an animated GIF Free online without using Photoshop. You can create an animated picture for Free online. Some online tools online are complicated and require a lot of knowledge and some are simple to use.
This lesson is going to teach you how to make a very simple animated picture using an online site. You don’t need to create an account on their site to use their tool. If you want to save the animated picture then you do need an account. Otherwise, just copy the HTML when you are finished making your animated picture for use on your blog or website.
Collect the Images You Want to Use:
You will need to have the images you want to use already on your computer somewhere. If you find pictures you want to use online you need to save them to your computer first.
It helps if the pictures are all the same size. The graphics I am using are 150 x 150 pixels.
I am using 3 graphics to make a very simple animated GIF. You can use more or less but you need at least 2 to create animation. You can also use stills from a video to create an animated GIF.
This is what my animated GIF looks like. It is very simple. You can really create some amazing animated GIFs with better transitions if you have enough images.

Step One: Visit makeagif.com
If you want to make any changes to your animated GIF once it is created, you must create an account
Step Two: Click Add Pictures to select the images from your computer.
If you have all of the images in one folder then you can click on the first, hold the Shift key down and click on the last to select them all. You can also click on one image and hit upload and go back and get the rest one at a time.
Step Three: Scroll down and click and drag the images around until you have them in the order you want them to appear. When you have them in the order you wish them to appear, click Continue.

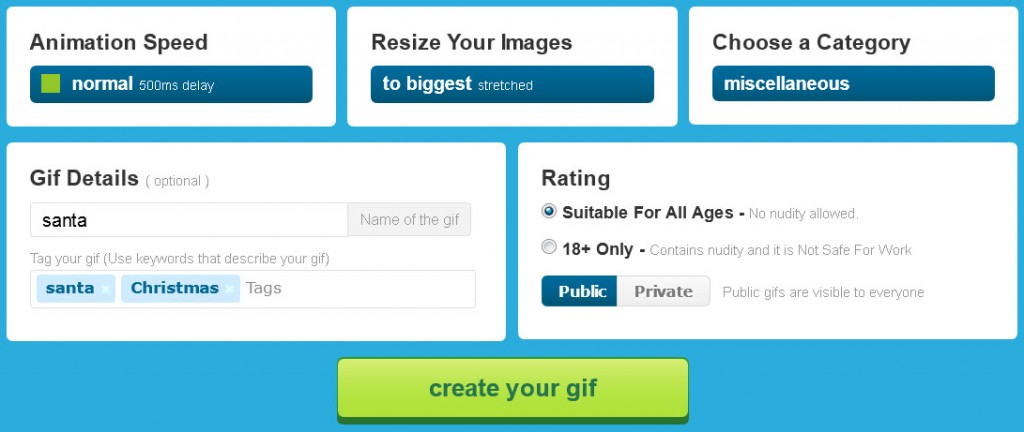
Step Four: Now you will chose the speed of your animated GIF, the size, and give it a name.

NOTE: Because you are creating your animated GIF on makeagif.com, you will be required to put it in a category, choose the age rating, and give it tags. This means that your GIF will appear on their site and anyone will be able to use it and download it. This is the tradeoff for using a free online site to create an animated GIF and not Photoshop.
Step Five: Click the Download button to save the .GIF file to your computer.
If you want to use it on your blog, just add it into a blog post like any image.
PhotoShop is one of the best programs for creating animated GIFs but you can also use free online tools as well as ImgFlip, GifMaker, or Gimp.


Leave a Reply